Google Docs is a versatile word processing tool that allows users to create, edit, and format documents with ease. Adjusting margins in Google Docs is a simple yet powerful feature that enables users to customize the layout and appearance of their documents according to their preferences. In this comprehensive guide, we’ll explore five key points to help you adjust margins in Google Docs effectively and enhance your document formatting.
1. Accessing Page Setup:
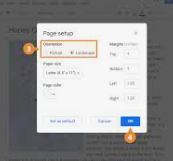
To adjust margins in Google Docs, start by opening the document you wish to modify or create a new document. Next, navigate to the top menu and click on “File,” then select “Page Setup” from the dropdown menu. This will open the Page Setup dialog box, where you can adjust various settings, including margins, orientation, and paper size.
2. Setting Margins:
In the Page Setup dialog box, you’ll see options to adjust the margins for the top, bottom, left, and right sides of the document. You can either enter specific measurements for each margin or use the preset options provided by Google Docs, such as “Normal,” “Narrow,” “Moderate,” or “Wide.” Experiment with different margin settings to achieve the desired layout and spacing for your document.
3. Previewing Margin Changes:
As you adjust the margins in the Page Setup dialog box, Google Docs provides a live preview of how the changes will affect the document layout. Take advantage of this feature to visualize how your document will appear with the new margin settings. Pay attention to how the text flows and whether any elements such as images or tables are affected by the margin adjustments.
4. Applying Margins to Specific Sections:
In some cases, you may want to apply different margin settings to specific sections of your document. Google Docs allows you to do this using the “Breaks” feature. To apply different margins to a specific section, place your cursor at the beginning of the section, then go to the top menu and click on “Insert” > “Break” > “Section Break (Next page).” Once you’ve inserted the section break, you can adjust the margins for that section independently of the rest of the document.
5. Saving Margin Settings:
After adjusting the margins to your satisfaction, click the “OK” button in the Page Setup dialog box to apply the changes to your document. Google Docs will automatically update the document layout based on the new margin settings. If you’re working on a shared document, keep in mind that the margin settings will apply to all collaborators viewing or editing the document.
Conclusion:
Adjusting margins in Google Docs is a straightforward process that allows users to customize the layout and appearance of their documents with precision. By following the five key points outlined in this guide—accessing Page Setup, setting margins, previewing margin changes, applying margins to specific sections, and saving margin settings—you can adjust margins in Google Docs effectively and enhance your document formatting. Whether you’re formatting a report, creating a flyer, or designing a resume, mastering the art of adjusting margins allows you to create polished and professional-looking documents that meet your specific needs and preferences. So next time you’re working on a document in Google Docs, remember these tips to customize your margins and elevate your document formatting.