Taking screenshots on a Chromebook is a convenient way to capture and share important information, memorable moments, or interesting content. Whether you’re troubleshooting an issue, creating a tutorial, or simply saving a funny meme, knowing how to take a screenshot on your Chromebook is a valuable skill. In this guide, we’ll explore five key points to help you capture screenshots effortlessly and make the most of your Chromebook experience.
1. Understand the Keyboard Shortcuts:
Chromebooks offer built-in keyboard shortcuts for capturing screenshots quickly and efficiently. The primary keyboard shortcut for taking a full-screen screenshot is pressing the “Ctrl” and “Show windows” keys simultaneously. The “Show windows” key is typically located in the top row of the keyboard, near the “Esc” key, and resembles a rectangle with two vertical lines on the right side. Pressing these keys together will capture the entire screen and save the screenshot to your Chromebook’s Downloads folder.
2. Capture a Specific Area:
In addition to taking full-screen screenshots, Chromebooks also allow you to capture a specific area of the screen using a keyboard shortcut. To capture a specific area, press the “Ctrl,” “Shift,” and “Show windows” keys simultaneously. Your cursor will change to a crosshair, allowing you to click and drag to select the area you want to capture. Release the mouse button to capture the selected area, and the screenshot will be saved to your Downloads folder.
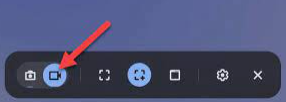
3. Use the Screenshot Tool:
Chromebooks also offer a built-in screenshot tool that provides additional options for capturing and annotating screenshots. To access the screenshot tool, press the “Ctrl,” “Shift,” and “Overview” keys simultaneously. The “Overview” key is typically located in the top row of the keyboard, near the “F5” key, and resembles a square with two horizontal lines on the right side. Once the screenshot tool is activated, you can choose to capture the entire screen, a specific window, or a custom area. You can also annotate the screenshot with drawing tools and text before saving it.
4. Utilize External Apps and Extensions:
If you require more advanced screenshot capabilities, such as capturing scrolling web pages or recording screencasts, you can explore external apps and extensions available for Chromebooks. There are several third-party apps and extensions available in the Chrome Web Store that offer additional features for capturing and editing screenshots. These tools allow you to capture specific elements of web pages, annotate screenshots with arrows and text, and even record video screencasts for tutorials or presentations.
5. Customize Screenshot Settings:
Chromebooks allow you to customize various settings related to taking screenshots, such as the file format and destination folder. To access screenshot settings, open the “Settings” menu on your Chromebook and navigate to the “Device” section. From there, select “Keyboard” and scroll down to find the “Screen capture” section. Here, you can choose the file format (PNG or JPG) and select the default destination folder for saving screenshots.
Conclusion:
Taking screenshots on a Chromebook is a simple and versatile process that allows you to capture and share important information, memorable moments, or interesting content with ease. By understanding the keyboard shortcuts, utilizing the built-in screenshot tool, exploring external apps and extensions, and customizing screenshot settings, you can capture screenshots effortlessly and make the most of your Chromebook experience. Whether you’re a student, educator, professional, or casual user, knowing how to take a screenshot on your Chromebook is a valuable skill that enhances productivity and creativity. So next time you come across something worth saving or sharing, remember these tips to capture screenshots effortlessly on your Chromebook.